Hey there, fellow engine enthusiasts! I’m here today to share some insights on how to install a timing chain kit on a multi – cylinder engine. And by the way, I’m part of a timing chain kit supplier team, so I’ve got a fair bit of knowledge on this topic. Timing Chain Kit
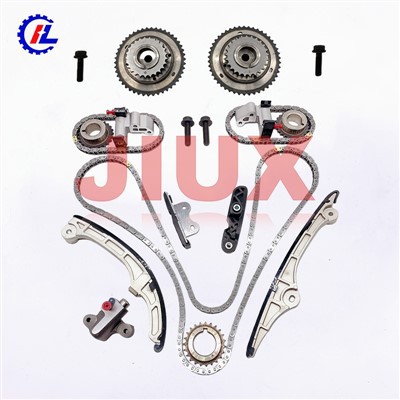
Let’s start with the basics. What exactly is a timing chain kit? Well, it’s a collection of parts that work together to keep your engine’s valves opening and closing at just the right time. This includes the timing chain itself, sprockets, tensioners, and sometimes guides. In a multi – cylinder engine, getting the timing right is crucial. If the valves open and close at the wrong time, you could end up with poor engine performance, misfires, or even serious engine damage.
Pre – installation Checks
Before you even think about installing a new timing chain kit, you need to do some pre – installation checks. First off, gather all the necessary tools. You’ll typically need a socket set, a torque wrench, a gasket scraper, and probably some pliers. Make sure your tools are clean and in good working condition.
Next, take a good look at your engine. Check for any signs of damage or wear that might not be related to the timing chain. If there are loose parts, leaks, or anything that looks out of place, it’s better to fix those issues before you start the timing chain installation.
It’s also a good idea to have your new timing chain kit right in front of you. Lay out all the parts and make sure everything is there. Compare the parts with the old ones (if you’ve already removed them) to ensure they match. As a supplier, we always make sure our kits are complete and the parts are of high quality, but it never hurts to double – check.
Removing the Old Timing Chain Kit
Once you’re all set, it’s time to start removing the old timing chain kit. Begin by draining the engine coolant. You don’t want coolant spilling everywhere when you start working on the engine. Locate the drain plug at the bottom of the radiator and let the coolant flow into a suitable container.
Next, remove the serpentine belt. This belt drives various engine accessories like the alternator, power steering pump, and air conditioning compressor. You can usually loosen the belt tensioner with a wrench and then slide the belt off the pulleys.
Now it’s time to get to the timing chain cover. Use your socket set to remove the bolts holding the cover in place. Be careful when you lift the cover off because there might be some coolant or oil still inside. You might need to use a gasket scraper to clean the mating surfaces of the engine block and the cover.
With the cover off, you’ll see the timing chain and related components. Before you remove the chain itself, you need to mark the position of the sprockets. This is super important because you need to install the new chain in the same relative position. You can use a piece of chalk or a marker to make clear marks on the sprockets and the chain.
Then, loosen the tensioner. The tensioner keeps the chain tight, so once you loosen it, you can usually slide the chain off the sprockets relatively easily. Remove the sprockets, guides, and any other components that are part of the old timing chain kit.
Installing the New Timing Chain Kit
Now comes the exciting part – installing the new timing chain kit. Start by cleaning all the mating surfaces thoroughly. You don’t want any debris or old gasket material getting in the way. Use a degreaser and a clean cloth to make sure everything is spotless.
Begin with installing the sprockets. Make sure they are aligned with the marks you made earlier. Use your torque wrench to tighten the sprocket bolts to the manufacturer’s recommended torque specifications. This is crucial because if the bolts are too loose, the sprockets could come loose during operation, and if they’re too tight, you could damage the sprockets or the engine.
Next, install the timing chain. Route the chain over the sprockets, making sure it follows the correct path. The new chain might be a bit stiff at first, but with a little wiggling, it should go on smoothly. Check again that the marks on the chain and sprockets are still aligned.
After the chain is on, install the guides. The guides help keep the chain in the correct position as it moves. Make sure they are properly seated and tightened.
Now it’s time to install the tensioner. The tensioner is what keeps the chain tight and ensures it doesn’t skip teeth on the sprockets. Follow the manufacturer’s instructions for adjusting the tensioner. Usually, you’ll need to use a special tool or a specific procedure to get the right tension.
Reassembling the Engine
Once the timing chain kit is installed, it’s time to start putting the engine back together. Clean the timing chain cover again and apply a new gasket. You can use a small amount of gasket sealer to help the gasket stick in place, but be careful not to use too much.
Place the cover back on the engine block and start tightening the bolts. But don’t tighten them all the way at once. Tighten them in a criss – cross pattern in multiple passes to ensure even pressure. This helps prevent the cover from warping and leaking.
Reinstall the serpentine belt. Make sure it’s properly routed over all the pulleys. You might need to use the tensioner again to get the belt on and adjust its tension.
Finally, refill the engine coolant. Make sure you use the correct type of coolant for your engine and fill it to the proper level.
Post – installation Checks
After you’ve reassembled the engine, you need to do some post – installation checks. Start by checking for any leaks. Look around the timing chain cover, coolant hoses, and anywhere else there might be a potential leak. If you find a leak, tighten the bolts or connections as needed.
Next, turn the engine over by hand a few times using a socket on the crankshaft pulley. This helps make sure the timing chain is moving freely and there are no binding issues.
If everything looks and feels good, it’s time to start the engine. Listen carefully for any strange noises. A rattling or clicking sound could indicate a problem with the timing chain installation, like incorrect tension or misaligned sprockets.
If the engine starts smoothly and runs without any issues, congratulations! You’ve successfully installed a timing chain kit on a multi – cylinder engine.
Why Choose Our Timing Chain Kits
As a timing chain kit supplier, we take pride in offering high – quality products. Our kits are made from top – notch materials, which means they’re durable and can withstand the high stresses of engine operation. We also test each kit to ensure it meets or exceeds industry standards.
We understand that every engine is different, so we offer a wide range of timing chain kits to fit various multi – cylinder engines. Whether you’ve got a V6, V8, or an inline – 4 engine, we’ve got a kit that’s right for you.

And our customer support team is always ready to help. If you’ve got any questions about installation, or if you’re not sure which kit is the best fit for your engine, just reach out to us. We’ll guide you through the process and make sure you get the right product.
Transfer Case Chain If you’re in the market for a new timing chain kit for your multi – cylinder engine, don’t hesitate to get in touch with us. We’re here to make your engine repair or upgrade as smooth as possible. Whether you’re a professional mechanic or a DIY enthusiast, our timing chain kits are a great choice. So, drop us a line and let’s start talking about how we can help you keep your engine running at its best.
References
- "Automotive Engine Repair Manual"
- "Fundamentals of Vehicle Technology"
Huzhou Hongli Auto Parts Co., Ltd.
With abundant experience, we are one of the most professional timing chain kit manufacturers in China. Please rest assured to buy customized timing chain kit at competitive price from our factory. If you have any enquiry about cooperation, please feel free to email us.
Address: Building 16, No.50 / Building 18, No.58, Dadongwu, Lianshi Town, Nanxun District, Huzhou, Zhejiang, China
E-mail: jiux@timingkit.cn
WebSite: https://www.jiuxkit.com/
